ClockIn: Preparing the Shortcode

Last time I basically shutdown all possibilities of using google calander, but thats fine, SQL is an efficient alternative and it should be no issue.

CREATE TABLE Clock_ins (
 time datetime DEFAULT NOW() NOT NULL,
 duration int DEFAULT 0 NOT NULL,
 user tinytext NOT NULL,
 project tinytext NOT NULL
 );

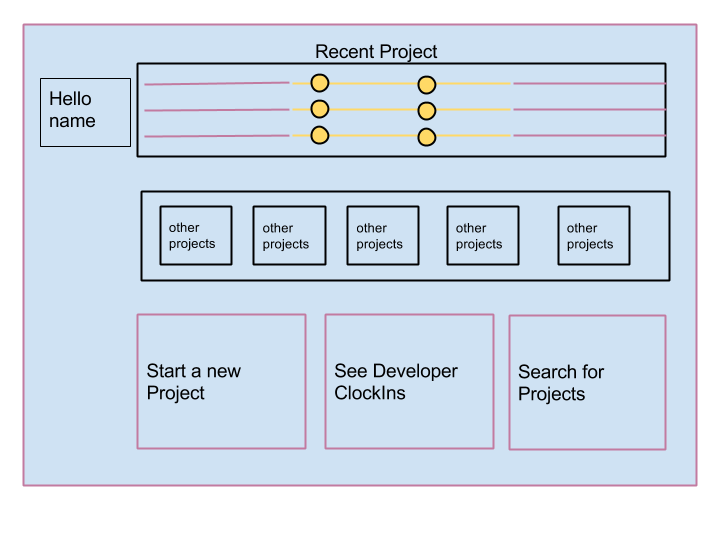
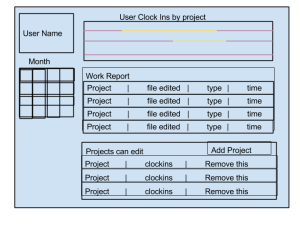
Now, theres 3 main UIs I need to focus on

  1. Clock In, Clock out-This will be in the sidebar, or really where ever someone wants to put it
  2. Project Chooser-When we begin to clock in, we need to be able to choose from our existing repositories
  3. Clock In Viewer (User and Project mode)-Whats a database if we can’t view it? Here we give sexy charts for people to look at to make them feel comfortable (We’ll worry about this later

So For Clock In, Clock out…. We’re going to want to add in a some WordPress Shortcode tags so that we can place it anywhere we want Our shortcode is going to be called [clock_in] and theres three major things we’ll be needing from the user -Their user id -their github id -The project they’re going to clockin to

function clock_in_setup( $atts, $content=null) {
 $current_user = wp_get_current_user();
 $message;
 $href;
 $type = "ajax";

 if ( !($current_user instanceof WP_User) ){
 $message = "Please Login First";
 $href = wp_login_url( get_permalink() );
 $type="self";
 }else if(($meta = get_user_meta($current_user->ID, "clockin")) == array()){
 $json = json_decode(file_get_contents(plugin_dir_path( __FILE__ )."/secret.json"));
 $cid = $json->cid;
 $redirect_uri = plugins_url("auth.php", __FILE__);
 $state = "clock-in_plugin".$current_user->ID;

 $href = "https://github.com/login/oauth/authorize";
 $href .= "?client_id=".$cid;
 $href .= "&redirect_uri=".$redirect_uri;
 $href .= "&state=".$state;

 $message = "Authorize our plugin";
 $type="blank";
 }else if(isset($atts["cur_project"])){
 $nonce = wp_create_nonce("clock_in");
 $href = admin_url('admin-ajax.php?action=clock_in&proj='.$atts["curproject"].'&nonce='.$nonce);
 $message = "Clock in!";
 }else if($meta["clocked"] == true){
 $nonce = wp_create_nonce("clock_in");
 $href = admin_url('admin-ajax.php?action=clock_out&nonce='.$nonce);
 $message = "Clock out!";
 }else{
 $href = plugins_url("clocked.php", __FILE__)."?action=in";
 $nonce = wp_create_nonce("clock_in");
ob_start();
?>
 Choose a project to Clock Into
 <div class="clockin-wrap">
 <a style="display:inline-block;height:144px;width:64px;background-color:#000;"></a>
 <div class="clockin_projects" style="display:inline-block;height:144px;width:144px;">
 </div>
 <a style="display:inline-block;height:144px;width:64px;background-color:#000;">
 </a>
 </div>
<?php
 wp_enqueue_script ('clock_in_proj');
 wp_localize_script('clock_in_proj', 'clock_in_vars', array("github_user"=>$meta["github"], "clockin_uri"=>admin_url('admin-ajax.php?action=clock_in&&nonce='.$nonce)));
 return ob_get_clean();
 }
 ob_start();
 ?>
 <div class="clockin-wrap">
 <a class="clockin_anchor" href=<?php echo $href; echo ($type != "ajax")?" target=".$type.'"':''; ?> ><?php echo $message ?></a>
 </div>
 <?php 
 if($type == "ajax"){
 wp_enqueue_script ('clock_in');
 }
 return ob_get_clean();
}

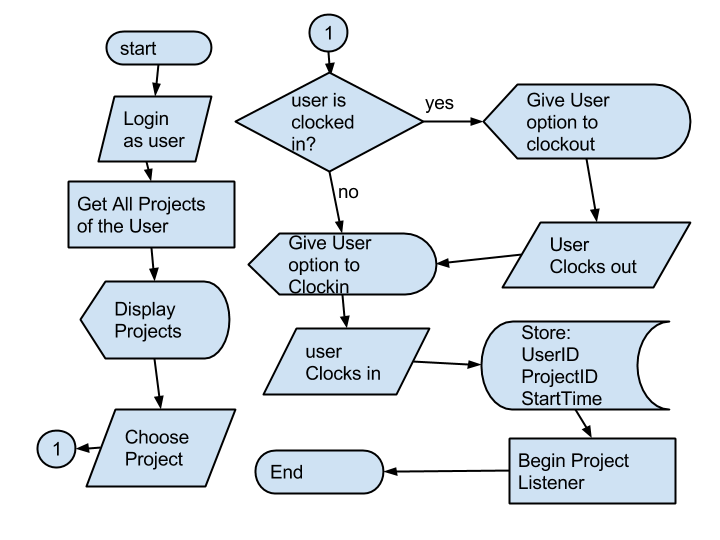
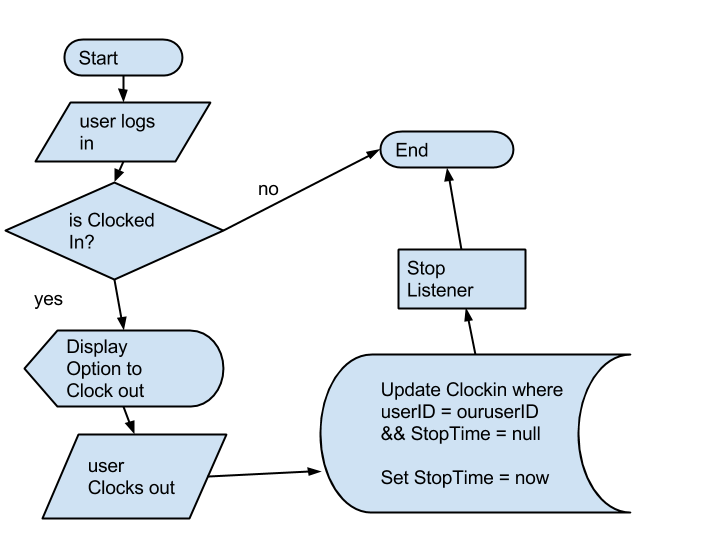
What I’m doing here essentially is creating a link where ever the shortcode is. The Link will either;  direct to login, direct to github authorization, if its a project page, allow person to clock in, display logged persons projects to clock in or show clockout link. Next we need to make sure we authenticate with github, then display our projects properly

Google API + WordPress: A Problem, an Inconvienience and a Killer

I started off planning on using Google Calanders to store my clockin information. I was doing this for one main reason: Its important that how I store the information is standardized in case I attempt to export my plugin to node.js or another platform. But there is a problem I ran into that I realized may turn very annoying or worse.

Refresh Tokens are not unlimited

this will create an awkward situation once the refresh tokens run out and the website owner is forced to login and authorize again

And as a minor inconvienience

Google Authorization Doesn’t allow Get parameters in the url

Perhaps this is a problem on WordPress side more than googles in the way they setup their admin. Essentially I’m forced to create a plugin url that is independent from the direct flow. Making either the user Leave the admin interface conpletely or doing it through a popup. Then Instead of storing it in WordPress Options, we’d be storing it in a seperated SQL table to avoid loading wp-load.php. These are definitely managable, though not entirely preferable. If I’m using a content management system, I’d rather feel as though I can do everything in a very sexy and clean manner. Rather than go through hoops.

nonetheless I will continue to make the plugin as is simply for experience sake. Though I recognize this is definitely not final version

Update: What Killed using Google API as a web service was the fact that I am forced to use give my webserver an key file. This will not make future installations happy for random people. As a Result, I’m going to drop google calander from the design spec and move onto something else. This isn’t necessarilly Google Calanders Fault, but rather a design philosophy Flaw. I wanted to Use Google Calanders as My database, but I didn’t want to have to make installation a hassle. as a result, I gotta move on.

I’ll go with what is important

  1. Start DateTime
  2. Duration in seconds
  3. Github User
  4. Github Project

Clockin WordPress Integration: Million ways to get it, choose one. pt1

So at this point we can….
1) Retrieve a Github info
2) Retrieve google calender info

But one thing we have yet to do is provide a place where we can actually clock in and clock out. Now we can do this in a variety of ways….

  • Custom Post Types to define Projects and Users
    -they would literally just be place holders to avoid storing tons of duplicant data
    -Would be based off any user that enters our website and allows our app to access their github profile

    • Pros
      -We don’t need javascript to display data
      -Pretty URLs will be enforced
      -Good for SEO
      -Can Be Placed in a Plugin
    • Cons
      -Whats the point of creating a reference?
  • Query Based Multiple Page Service
    -We would create a page that is based off a template we created
    -In the template we would get the queries and give the appropiate data back

    • Pros
      -clean and neat
      -Can make it SEO Freindly
    • Cons
      -Would have to define an archive and various link tags to make it SEO freindly
      -Ugly Urls
  • Single Page Service
    -Using Ajax, we would do everything right from the one page

    • Pros
      -Clean and Neat
      -Pretty Url… Well theres only one….
      -Can be stored in a plugin
      -Nothing is stored
    • Cons
      -Requires Javascript
      -Will need to deal with the data in the browser
      -No SEO

So here’s our choices, I’ll assume you assumed which I’m going with… And if you didn’t assume, I’ll give you a hint “Type Post Custom”. WordPress is wonderful in that it gives you pretty URLS, it gives you proper SEO in a variety of ways, makes your URLs beautful and on top of that you can avoid alot of the struggles you would enter into with your own Content Management System,  such as creating a proper PHP class to interact with sql.

We really want to make sure this is a plugin also to allow ourselves some breathing room in terms of installation.

So Lets begin by creating our plugin

Now Things we will have to include are….

  1.  Creating a Custom Post Type for Users and associating it to a User
  2. Creating a Custom Post Type for Projects
  3.  Giving people the opportunity to choose their Calender
  4.  Auto Load on new sites to old calanders

So lets prepare in the Init, we’re going to leave out the auto load for now

add_action( 'init', 'initialize_clockin' );
function initialize_clockin() {
 register_post_type( 'clockin_dev',
  array(
   'labels' =&gt; array(
    'name' =&gt; __( 'Developers' ),
    'singular_name' =&gt; __( 'Developer' )
   ),
   'description' =&gt; 'The user object associated with the wordpress user. stores the guthub username as well',
   'public' =&gt; true,
   'has_archive' =&gt; true,
   'show_ui' =&gt; false,
   'show_in_menu' =&gt; false,
   'supports' =&gt; false
  )
 );
 register_post_type( 'clockin_project',
  array(
   'labels' =&gt; array(
   'name' =&gt; __( 'Github Projects' ),
   'singular_name' =&gt; __( 'Github Project' )
),
   'description' =&gt; 'Associated to Github Project',
   'public' =&gt; true,
   'has_archive' =&gt; true,
   'show_in_menu' =&gt; false,
   'supports' =&gt; false
  )
 );
 add_option("Calander ID", null);
}

Now lets create our admin page

This is the code I came up with. I preferred the object oriented approach so that I can store it in a different file

<?php
class clock_in_admin {
 public $options;
public function __construct(){
 add_action( 'admin_menu', array( $this, 'add_to_menu' ) );
 add_action( 'admin_init', array( $this, 'page_init' ) );
 }
 public function add_to_menu(){
 add_options_page( "Clock In Settings", "Clockin", "manage_options", "clock-in-admin", array($this, "admin_page"));
 }
 public function admin_page(){
 $this->options = get_option( 'clock-in' );
?>
 <div class="wrap">
 <?php screen_icon(); ?>
 <h2>Clock In Settings</h2>
 <form method="post" action="options.php"> 
 <?php 
settings_fields( 'clock_in_fields' );
 do_settings_sections( 'clock-in-admin' );
 ?>
<?php submit_button(); ?>
 </form>
 </div>
<?php
 }
 public function page_init(){
 register_setting('clock_in_fields', 'clock-in', array( $this, 'sanitize' ) );
 add_settings_section('clock-in-cal', 'Google Calender Setting', array( $this, 'print_section_info' ),'clock-in-admin');
 add_settings_field('calender-id','Calander ID',array( $this, 'calander_id_input' ),'clock-in-admin','clock-in-cal');
 }
 public function print_section_info()
 {
 echo 'Enter your settings below:';
 }
 public function sanitize( $input ){
 if( isset( $input['calender-id'] ) ){
 //need to check if the calender exists and we can't view and edit it
 //if we can't edit it, we need to ask for permission
 $this->options['calender-id'] = $input['calender-id'];
 }
return $this->options;
 }
 public function calander_id_input()
 { ?>
 <input id='calender-id' name='clock-in[calender-id]' size='40' type='text' value='<?php echo $this->options['calender-id'] ?>' />
<?php
 }
}
?>


Hello World: Google Calanders

So, the second main technology I’d like to use is google calenders
Lets have a look at their API 🙂

Now to start out, just looking at the google calender we can see that we can add an event to a previous date as well as edit previous actions. This looks good so far

In all We’re going to be looking for
1) Ability to add an event
2) Ability to edit an event
3) Ability to store Arbitrary Data about what we’re working on
4) Ability to specify a user either based on email address or even better a generic name

Our calander is going to be dependent on the company that uses it as a result we’ll be interested in using

https://www.googleapis.com/calendar/v3/calendars/{your calander id}/events/{the event id}?parameters

as our main Rest Query

To find the calender id

  1. add a new calender
    google calander
  2. go to calender settings
    calander settings
  3. Find the ID at the very bottom
    calander id


So Here is the basics of how we’re going to do this…

  1.  We create a new event storing…
    1. User
    2. Project
    3. The Start Time as the Event Start, Stop Time = Start Time
  2. On Clock Out We find
    1. All events that have the Github User (Sorted by startdate, descending)
    2. Get The Last one
      1. (Start time == Stop Time)?Set Stop Time = Date.Now():This user can’t clock out;

Looks good
So First we want to be able to Create events on our calander

Attendee[].email = github email
Attendee[].displayname = github username
summery = github project name
start = date.now()
end = date.now()

(One thing I love about google api’s is they make it real easy for you to try something out)

now Originally, I planned to store the information in attendees and title. But as it turns out, you can’t query attendees nor title… So……
Extended Properties it is!

POST https://www.googleapis.com/calendar/v3/calendars/{your calander ID}/events?key={Your Api Key}

{
 "end":{"dateTime":"2014-1-7T13:31:00-08:00"},
 "start:{"dateTime":"2014-1-7T13:31:00-08:00"},
 "extendedProperties":{
  "shared" : {
   "user":"github-username",
   "project":"github-repo"
  }
 },
 "summary": "git-username worked on github-repo"
}

Next we want to request

Important to note we want singleEvents to be true in order for us to be able to sort properly and we want to sort by startTime

GET https://www.googleapis.com/calendar/v3/calendars/{google calander id}/events?orderBy=startTime&amp;sharedExtendedProperty=User%3DGU&amp;singleEvents=true&amp;sortorder=descending&amp;key={your api key}

Success, but there’s one problem, the sort order…
currently its ascending which means we’ll get the very first clock in that’s ever be done is the first we’ll receive. When we have 50+ clockins this will be an issue since we’ll have to go through the pages to find the very last clockin.  However, a little research shows we can set the sort order to be descending

Next Thing We Want to do is update on clock out, this will be an update to change its end time
Using the first item (root.items[0]) we’ll grab its ID and make an update, after taking a look at the update though we see we are forced to supply the start time and the end time. Thats more information than we truelly desire to redeliver, as a result we can instead use patch

PATCH https://www.googleapis.com/calendar/v3/calendars/{your calander id}/events/{the event id}?key={your api key}

{
 "end": {
  "dateTime": "2014-1-7T15:03:00-08:00"
 }
}

And We have it! Clocking in and Clocking out!
There’s other ways we could have done this, for example we could have stored the ID after clockin locally. However if the user changes computers or etc, then we run into an issue. that being said, we can always change that later

Version Control: Setting Up Git on Godaddy

So one of the things I’d prefer to do is to work on my website locally then push to github and my server. Easy to say like most concepts…

Now at times I just don’t want to figure things out, as such I chose to use someone elses work. This is a great Article on it. Now despite following the tutorial to a T I ran into issues, not because its a bad tutorial, because for anything, the amount of work and research that goes into something like this is very very very commendable. No work should ever be downplayed, though Its important to look at what is flawed.

I’m not going to rewrite the article but theres a few peices you will want to keep in mind
1) When editing your files from the shell, your most likely going to have to use vi the reason for this is you would have to install other file editors to use them
2) The Command

git remote set-url origin ssh://username@domain.com/~/repo/app_name.git

is actually

git remote add origin ssh://username@domain.com/~/repo/app_name.git

this may seem small, but you’ll be running into headaches if you don’t pay attention

3) if you’d like to include github to the mix, I’ll want to setup an ssh key for github https://help.github.com/articles/generating-ssh-keys

then in a similar fassion

git remote add github git@github.com:UserName/Repository.git

4) Get used to the following commands
-As I’m relatively new to git, I kinda learning the important aspects

Remember to change your directory to the working directory

cd /Path/to/your/local/repository
git add .
git commit -m "your message" .
git push github master
git push origin master

I might store this in a script that I’ll just run as needed

Hello World: Github

So I need to create an application to interact with Github
What I want…

  1. The Current Users Available Repos-Save the User ID
  2. Ability to access a specific Repo-Save the Repo ID
  3. Ability to show work done on that repo

Following the API, here are the basics

GET https://api.github.com/users/formula1/repos with a header specifying version 3

Click to get Current Repos
Click for something pretty
Click to hide

Now this is good for just me, but what about anyone who want to clock in? I need to authenticate… I’ll get to this later

Now, to be able to choose a repo and see the work Click Here

Now the instance work isn’t nearly as important since I can’t quantify that quite same as I can quantify times. However, that is possible as well.


Heres the Source code. Simple but straight forward.

jQuery(function(){ jQuery(".githubrepo").click(function(e){  e.preventDefault(); 
 jQuery.ajax({
 url: "https://api.github.com/users/formula1/repos",
 type: "GET",
 beforeSend: function(xhr){
 xhr.setRequestHeader('Accept','application/vnd.github.v3.full');
 },
}).done(function(content){ 
 jQuery("#github-repos-example").text(JSON.stringify(content)); 
 }); 
});
jQuery(".githubpretty").click(function(e){ 
 e.preventDefault(); 
 jQuery.ajax({
 url: "https://api.github.com/users/formula1/repos",
 type: "GET",
 beforeSend: function(xhr){
 xhr.setRequestHeader('Accept','application/vnd.github.v3.full');
 },
}).done(function(content){ 
 for(var i=0;i<content.length;i++){
 jQuery("#github-repos-example").append("<span style='display:inline-block; padding:10px; background:#000; color: #FFF;margin:1px;'>"+content[i].full_name+"</span>");
 }
 }); 
});

jQuery(".githubhide").click(function(e){
e.preventDefault();
 jQuery("#github-repos-example").text("");
});
jQuery(".githubproj").click(function(e){
 e.preventDefault(); 
 jQuery.ajax({
 url: "https://api.github.com/users/formula1/repos",
 type: "GET",
 beforeSend: function(xhr){
 xhr.setRequestHeader('Accept','application/vnd.github.v3.full');
 },
 }).done(function(content){ 
 jQuery("#github-repos-example2").text("");
 for(var i=0;i<content.length;i++){
 jQuery("#github-repos-example2").append("<a href='"+content[i].url+"/commits' style='display:inline-block; padding:10px; background:#000; color: #FFF;margin:1px;'>"+content[i].full_name+"</a>"
 );
 }
 jQuery("#github-repos-example2>a").click(function(e){
 e.preventDefault();
 jQuery.ajax({
 url: jQuery(this).attr("href"),
 type: "GET",
 beforeSend: function(xhr){
 xhr.setRequestHeader('Accept','application/vnd.github.v3.full');
 },
 }).done(function(content){ 
 jQuery("#github-repos-example2").text("");
 for(var i=0;i<content.length;i++){
 jQuery("#github-repos-example2").append("<div style='border:1px solid #000;'><span>Date: "+content[i].commit.committer.date+"</span><br/><span>Name: "+content[i].commit.committer.name+"</span><br/><span>Message: "+content[i].commit.message+"</span></div>"
 )
 }
 });
 }); 
 }); 
});
});


Clock In: Top Down Design

One of the major components that made my old site special was my clockin service. What it offered was for me to be able to clockin to any of my projects, this saved a start time. That started a listener (Imagine a machine that waits for something to happen before it does what it does) for any new file being created to see what work I did. Then On clock out, stop the listener and save a stop time.

Pseudo Code

Now Overall here is the Way it works
1) As a User, I choose from a variety of projects or have the ability to start my own
2) I then clock into that project
2a) The start time is saved
2b) A listener to see what work I’ve done is created
3) Once I’m done I clock out
3a) The stop time is saved
3b) The listener is stopped

On top of that other people can go through the various projects and users to see their start and stop times as charts
1) Daily
2) Weekly
3) Monthly

UI

For UI, this is something basic to go off of
UI (2)UI (1)UI


FlowChart

For Flow Charting This is what I’m Looking At

UI (3)UI (4)

Objects

User
-ID-Integer (Auto Increment)
-Projects they can edit-Array[ProjectID] (If a project is deleted, this needs to be updated)

Project
-ID-Integer (Auto Increment)
-String-Path/URL/Location to start listener (must be real)

ClockIn
-ID-Integer (Auto Increment)
-User-UserID
-Project-ProjectID
-StartTime-Date
-EndTime-Date

Work
-Id-Integer(Auto Increment)
-Clockin-ClockIn ID (Dependent, if its Clockin is deleted, its deleted)
-Time-Date
-Type-Create, Save, Delete (Research may also be included)

Technology

Now this is all pretty straight forward, lets take a look at what technology we want to use

  1. User-Whatevers convenient, Preferably WordPress considering that’s my cms
  2. Project-Github Github and Github
    -Github is the standard of version control. As a Result, we want people to use good things, the best of things in addition to user our clockin service.
  3. ClockIn
    -This is something I realized is a bit of an issue. I can have hundreds of Clockins which isn’t necessarilly a problem. But what Is a problem is when I lose my data when my server goes down. Or even when I transfer servers like I’m doing now. Though I don’t want to use a third party service I fear I may have to.

    I generally like to use technologies I will most likely use later so…

    So I have 3 choices…

    1. Google Spreadsheets
    2. MongoDB
    3. Google Calander
  4. Work
    -Though My old system was based off of the servers file system, the system I want to create is more likely to be based off of Github. As such I need to be able to grab from github whatever they do. That means pull requests, pushes, etc. I need to tell my people, push often 😉

So…
User-GIthub
Project-Github
Clockin-Google Calander for now (as it is the most reusable technology)
Work-Github

Transfering My Old Stuff

One of the things I’m going to have to do is be able to look at my old project in order to incorperate things I especially liked into WordPress. Among them are my Clock In system, Fractals. Now This isn’t just a two step process since most of my experimental work is on the server (which is bad mkay [your [production site should never be your experimental area {but for every rule there are exceptions}]) as a result I have to do a few things….

  1. Setup a local server
  2. Import all my files into the server
  3. Import my SQL database into the server
  4. Do little things to make sure everything is in proper working condition

Setting Up my Local Server

Setting up a local server can be done in a few ways. As I’m on windows, things become like cake. I’ve also done this on linux, and for what its worth, there is plenty of documentation out there to do it. For my purposes, I like to avoid ISS. The reason for this is I found it previously to have a bad user interface. What I’ve enjoyed in the past is Xampp.

xampp


Its a simple Install, It works, and Easily accessible. Theres not much else you can ask for from a service, or anything really.

Now, I don’t want to turn this into a tutorial but more of a general description of my experience. Nonetheless, Due to the nature of this, Its going to be one and I’m aware of that.

Importing All My Files

Now, I already have Filezilla installed because its near the best ftp (file transfer protocol) experience I’ve had. but just for giggles I’ll show you another cute little trick

windows ftp


Whenever you have any folder open in windows, you can change the path to be “ftp://your-web-server” and you will have an easy to use method of accessing your webservers files. Now I am using filezilla currently, but I should be using a revision control system such as Mecurial, tortoise or even Github. I’ll definitely say I learned my lesson about version control over the last couple months.

If your going to be installing FileZilla like I’m using, remember to install the client version. The Server is quite literally for servers (I’ll go over that on another topic), its meant to be able to receive FTP calls, not make them. Servers are listeners not talkers.

After you’ve installed, got Xampp and FileZilla installed, We want to do a few things….

  1. Figure out what our hosts ip address is
  2. Create an FTP user so we can access our files
  3. Login

Our Ip address will be localhost.
There are other ways to figure it out like understanding what our ip address is to ourselves. but when it comes down to it, localhost is the clean and simple way.

Creating an FTP user
On the Xampp Panel, you want to click “admin” for the FileZilla Section

admin

From there we open up our admin menu and go to user accounts

fzadminThen we add our user

fzuseraccountsSimple as that

Back to our Filezilla client
filezilla


Up top, we want Localhost, Username, Password, Go!
You can also save, but I don’t need to worry about that right now.

From there I connected to my old server, dropped all my stuff in the htdocs folder of my local server, which is located directly under your xampp root.

Import my SQL database into the server

This is a pretty simple process. You’re going to want to go to your original sites SQL admin page. Go to export, save the text file. Then go to your local page go to import and choose the text file.

SQL Export

The File

import

Making Sure Things are working Properly

This changes from system to system. For me This is completely custom and as much as I’d love to show how the system works. More importantly I’d just like to get it overwith. see you tomarrow! 🙂

A ReEntry to WordPress

I build wordpress for clients mostly, but had big plans for my own website. However, after a month of work and a lot of research I’ve come to understand what it really means to… create a content management system. There are many things to keep in mind, access to your database, providing a nice looking interface. Making things simple yet also allowing complete customization. The User Object. Which should be static methods, which should be instance? There is a lot too it, and I finally had decided that getting my website up and running is far more important than spending years on a website that (no offense to websites) is not very high on my priority list.

What I will say though is
1) CMS’ are meant to be easy to install, easy to begin and easy to use
-Wordpress is absolutely adorable compared to what I had been working on so hard for most of my workday.
2) CMS’s data are meant to be transportable
-Now wordpress isn’t necessarilly transportable, however you can definitely export your data as a solid XML file and due to its popularity importable as well
-for my own work, its definitely obvious I won’t be accessing the data quite so soon. Exporting to XML is the easy part, importing is a completely seperate beast
3) If your going to make a user interface make you can use it again
-for me I wanted to use XSL badly, and I still do. But the complexity in automation turned an interesting idea into a beast of its own. I’ll talk about it later when I get back into it. However, the important parts isn’t the XSL but rather the HTML. css and javascript
4) Routing is one if not the most important part of a CMS
-User Permissions are based off what is asked for
-Automation is very very important when dealing with an unknown amount of objects with unknown methods
-These are two things that held me back the most

Now I can’t say I want to use wordpress, but I definitely prefer it currently over slaving away for hours inorder to give myself more hurdles. Having the requirements change, introducing new technology mid project, these are things I’ll have to deal regardless. However, to me, finishing something is far more important than making it perfect.